Search This Blog

Featured Post

Christmas Crafts: Diy Elf on a Shelf with Outfit Tutorial

This post may contain affiliate links, please check out my disclosures page for more info.  Thanks! For my first project for Christmas, her...

Monday, October 31, 2011

Happy Halloween

What a Treat, A Halloween PoemWhat a Treat

Halloween is here with trick-or-treating tonight.
So I’ll tell you the story of a man named Dwight.

Dwight’s fondest wish was to give out some treats
that would be the best most brilliant on his street.

He would fill his bowl with all sorts of goodies galore
that would leave the children begging for more.

He went in search for them, the best he could find.
With the sweetest and sugary-est, surely he’d shine.

And with his bowl full of crunchies, he set his place near the door,
Set ready to welcome the trick-or-treating hoard.

First came one ghost, then a princess and such.
Seeing the bowl, they made such a fuss.

Until a vampire shouted from up the way
which made the children scurry away.

Apparently Mrs. Johnson from up the street
was giving out apples and Oh! what a treat!
Read More »

Friday, October 28, 2011

Birthday Again

Well another year has gone by, tomorrow is my birthday.  That yearly event always brings with it a yearly problem.  What do I give my twin sister for our birthday?
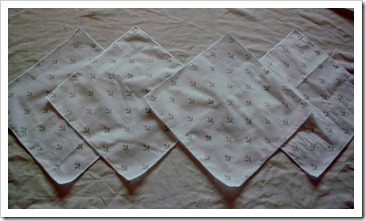
DSCI0909
This year it’s handkerchiefs.  I do enjoy making them and it’s one of the few things that I can make that she actually likes.  Despite being twins we have very little in common.  Anyway, these are just plain square handkerchiefs made from a small print cotton fabric.  They are intended to actually be used which is why it probably isn’t a problem that I used a one way print.  I not sure but it kind of looks funny to have the flowers on a printed handkerchief facing up.  Hope my sister doesn’t think so too.
Here’s the updated list:
  • Bags
  • Bracelets
  • Barrettes
  • Doll pajamas
  • Doll makeover
  • Wristbands
  • Red skirt
  • Ears
  • Costume
  • Handkerchiefs
Ten down and out.  And just in time for the holidays. 
Read More »

Thursday, October 27, 2011

Posted to Do

Lately I have gotten in to the habit of whipping out my camera whenever I see an interesting flyer/banner/poster for events and stuff.  It’s quicker and easier than writing the info down and a lot more interesting.  I decided to show off some of the ones I found this week for those of you in the area who need something to do this weekend.

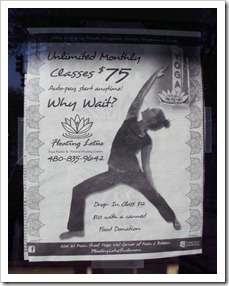
DSCI0819

This is a flyer for Lotus Flower studio, they seem to have a lot yoga classes and other sorts of fitness classes.  For classes, you can pay $75 for a month and take an unlimited number of classes for that month.  Seems like a good deal.  Plus for “drop-ins” on individual classes, it’s only $12 or $10 with a canned food donation.  They are located in downtown Mesa, AZ on the North West corner of Main St. & Robson.  Their website is at FloatingLotusStudio.com.

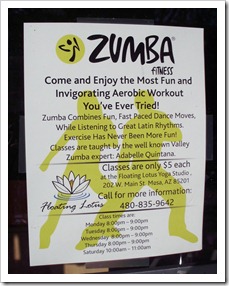
DSCI0821

This is a separate flyer I saw at the same studio.  It’s for Zumba classes, I guess it’s a new thing for them.  The classes are $5 each and are held from 8:00pm – 9:00pm Monday, Tuesday, Wednesday and Thursday and from 10:00am – 11:00am Saturday.

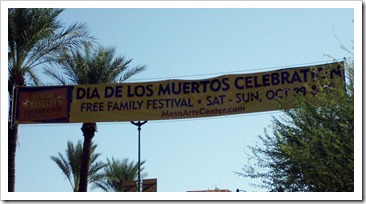
DSCI0824

I just happen to look up and see this banner.  The Mesa Arts Center is having their Dia De Los Muertos festival again this year.  It’s this Saturday and Sunday and as always it’s free.  See more about it at their website at MesaArtsCenter.com.

DSCI0828

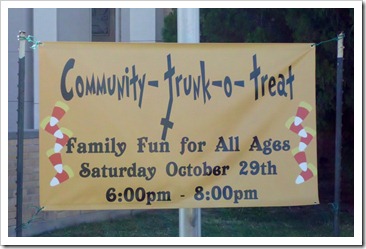
Of course I noticed this banner.  It’s for my church’s Community Trunk-o-Treat.  Saturday the 29th from 6-8pm several of our members will be parking their hopefully well-decorated cars in the lot and passing out candy.  Prizes go to the best decorated cars.  There will also be games, food, craft activities, a costume contest, and a haunted house later in the evening.  It’s on the South East corner of Center & 1st Ave. in Mesa and I hope to see you all there.

DSCI0871

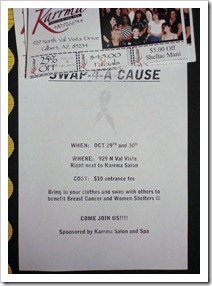
This one I saw on campus.  It’s an event sponsored by Karma Salon, Swap 4 a Cause.  You bring old clothes to swap and it benefits Breast Cancer and local women’s shelters.  It will be held on Saturday and Sunday next to the salon which is at 929 N. Val Vista Drive in Gilbert, AZ. and the admission is $10.

Read More »

Wednesday, October 26, 2011

All Ears

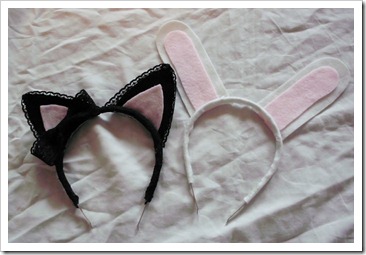
Less than a week until Halloween, so I made animal ears.  Now why in the world would I want to make these when I already have a costume?

Cat and Bunny Ear Headbands

First, they are so darn cute, especially the cat ears.  I didn’t put much effort in the bunny ears because I was just trying them out, they’re just scraps of white and pink felt glued on with a glue gun.  With the cat ears, I added some black lace to dress them up and a matching little black bow.  Super cute now.

Second, they are for backup.  It usually happens every year.  Some “accident” occurs leaving someone’s costume un-wearable, or my niece decides in the last minute that she wants to be something else for Halloween, or somebody insists that they aren’t going to dress up and then changes their mind.  For the most part, I’m prepared.

Here’s the updated list:
  • Bags
  • Bracelets
  • Barrettes
  • Doll pajamas
  • Doll makeover
  • Wristbands
  • Red skirt
  • Ears
  • Costume
  • Handkerchiefs
Nine down, just one more to go.  The next one will definitely be up by Friday, for a very good reason.
Read More »

Tuesday, October 25, 2011

Old and New Dolls

In case it isn’t totally obvious from the numerous posts on dolls and doll clothes, I love dolls and sort of collect them.  I recently added two new “friends” to my collection that I have yet to mention until now.

DSCI0832

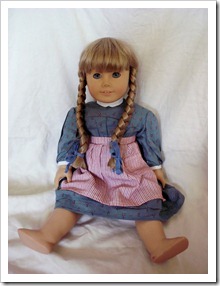
I was very excited about this one.  It’s an American Girl doll, Kirsten to be exact.  I found her at Goodwill last week for only 3 dollars.  Score!  I mean they are sold for like 100 dollars new, I don’t know about you but I prefer 3 dollars to 100.  Plus since I was little I kind of wanted one, but yeah, really expensive for a play doll.  I can sort of see the point of the price though, her hair is a wig instead of rooted hair like on most dolls and it’s really nice.  Her body feels surprisingly heavy and is very pose-able.  There are signs that she has been played with, (smudges on the limbs, stain on her dress which is hand wash only) but she still looks really good.   Basically she’s the kind of doll you could give to a small child without fear of her breaking it in a week.  She just needs a little cleaning and a new pair of shoes. 

DSCI0843

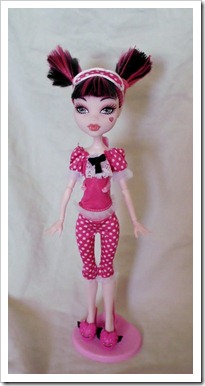
This one I had been looking forward to for a while.  She’s a Monster High doll.  Draculaura from the Dead Sleep line, hence the pajamas.  Basically she’s a cute vampire who likes pink.  I got her from Wal-Mart.com for about 10 dollars, Wal-Mart does have some of the best prices on these dolls especially compared to eBay.  These dolls are incredibly detailed from their interestingly designed heads down to their lovely fingers and toes.  Plus they are the most pose-able fashion dolls I have ever seen.  She can bend and turn in her knees, rotate her wrists, flex her arms, etc.  They have very fine joints, this is also part of the problem with these dolls.  The joints are also sort of delicate, not so much that they break if you so much as look at them, but they may not be suitable for younger children.  The age on the box says 6 and up and I think that might be too low, but then again it probably depends on the child.  Actually another problem is with how some people view this, I have seen reviews on Monster high dolls where people claim that the dolls are cheap, low-quality, and even over-priced due to the fact that their kids broke them so quickly.  Being fragile and being cheap are two different things.  I’ve seen porcelain dolls in stores labeled as being for children, if one of these got broken by a child who played with it would it be considered a “cheap” doll?  I guess it’s really a matter of whether or not you child knows how to take care of their dolls and behaves accordingly.  A child who throws toys should not have a porcelain doll, and a child who’s Barbie dolls are missing parts and have frazzled hair should not get a Monster High doll.  Maybe try one of those pricey American Girl dolls.  But maybe I’m overthinking all of this, what do you think?

Read More »

Monday, October 24, 2011

Fairy?

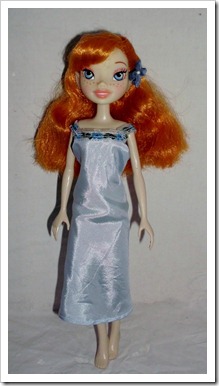
Not sure if I mentioned this before, but I found this doll at a Goodwill that was closing last summer.  She was interesting and only about 99 cents so I took a chance on her.  She kind of looked like she was suppose to be some sort of fairy doll, but I’m not sure which.  It says “Disney” on her back and head.  Anyway, she definitely needed some work, but that’s part of the fun of getting old dolls.

Elf/Fairy Doll Before

Before, her hair was matted and tangled with frazzled bits.  She was a little dirty with a bad hip.  And of course she had no clothes, do thrift stores purposely sell fashion dolls without their clothes or do people really donate them all like this?

Elf/Fairy Doll Makeover

After, I cleaned her up and trimmed and styled her hair.  I made her this lovely dress though it came out differently than I planned.  No worries, I like it better this way.  It’s trimmed with ribbon that has embroidered blue flowers on it.

Remade Elf/Fairy Doll

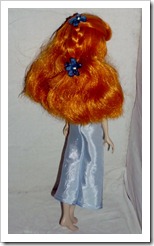
Going along with the blue theme, I added some small blue flowers to her hair.  Now she looks like a pretty elf or something along those lines.
Here’s the updated list:
  • Bags
  • Bracelets
  • Barrettes
  • Doll pajamas
  • Doll makeover
  • Wristbands
  • Red skirt
  • Ears
  • Costume
  • Handkerchiefs
Eight down, just two more to go.  The next project should be up by Wednesday or Thursday.
Read More »

Saturday, October 22, 2011

Oops, I forgot.

I forgot to mention this here, but I signed up for a pinterest account.  Just what I need right?  Another account that needs to be “maintained” regularly.  I just wanted to try it out, so many people I know have been raving about.  However, most people seem to think of Pinterest as a way to promote oneself.  I guess it sort of works for that, but I'm using it more as an organization tool.  That is was it was created for, I think.  For example, let’s say I wanted to get a jump on my project list for Christmas.  I just set up a board for it and pin all the cute Christmassy tutorials I find everywhere.  I’ll have them all conveniently in one spot.  Works pretty well that way for me, how about you?  What do you use Pinterest for?

Read More »

Friday, October 21, 2011

Plaid and Crochet for Dummies

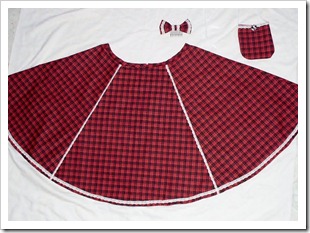
I found some red plaid fabric at a thrift store a while back, I can’t remember which one.  Anyway, I thought it would be perfect for a skirt even if it is sort of a cliché, the plaid skirt.

Red A-line Plaid Skirt with Accessories

I tried the same pattern as the skirt I made for class (see It's So Huge).  I think it came out better this time, however the picture came out worse.  Yep, I have some skills with a camera.

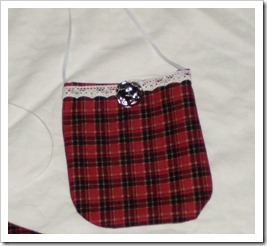
Mini Plaid Bag

Here’s a closer look at the matching accessories.  I thought of adding pockets to the skirt, but changed my mind while cutting the fabric for them.  I made them into a tiny bag instead.  My bags seem to be getting smaller and smaller for good reason.  As I mentioned before, smaller bags are better for choir since they fit under the robe.

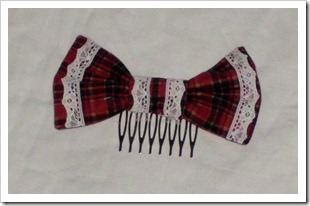
Plaid Hair Bow with Lace

And here’s the hair bow.  I realized that it’s been so long since I’ve made bows for my hair and the plaid looks good as a bow, so obviously I just had to make one.  I glued it to a hair comb since they seem to be more versatile than clips.

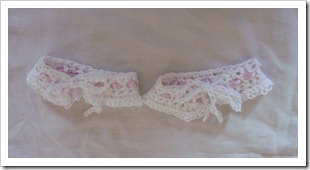
Crocheted Wrist Cuffs with Pink Ribbon

As a bonus, I also finished the wristbands on my list.  I realized it’s been quite some time since I crocheted anything, so I thought I should try to make something. Wristbands were perfect because they don’t require quite much skill, which I lack, or a pattern which I can’t read anyway.  That’s right, I can’t read crochet patterns.  Anyway, they simply tie on my wrist and have pink ribbon to make them cuter.  I just threaded the ribbon on a large needle and sort of weaved it on the wristbands after finishing them.  Adds a nice touch, right?

Here’s the updated list:
  • Bags
  • Bracelets
  • Barrettes
  • Doll pajamas
  • Doll makeover
  • Wristbands
  • Red skirt
  • Ears
  • Costume
  • Handkerchiefs
Seven down, just three more to go.  The next one should be up by Monday.
Read More »

Wednesday, October 19, 2011

Tiny Jim-Jams

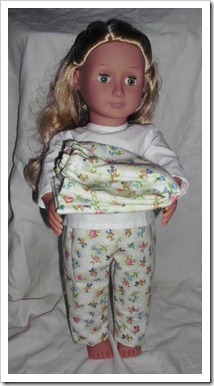
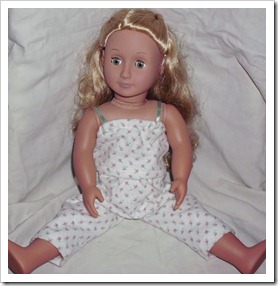
Due to recent trips to different thrift stores, I have assembled a decent collection of cute fabric remnants.  Two of these were of the softest, cutest material and best suited for pajamas.  But who could wear pajamas made from a remnant?
DSCI0769
How about our favorite 18 inch doll, Jenny?  Here she is wearing a pair of pajama pants made with a print featuring mushrooms and flowers.  She is holding the extra pair, there was plenty of fabric and I thought an extra pair would come in handy.
DSCI0764
The other remnant was a simple floral print and it wasn’t large enough for more than one pair of pants.  However, there was enough to whip up a quick tank top to match.  All she needs now is a blanket and slippers and it’d be perfect.  Maybe later.
Here’s the updated list:
  • Bags
  • Bracelets
  • Barrettes
  • Doll pajamas
  • Doll makeover
  • Wristbands
  • Red skirt
  • Ears
  • Costume
  • Handkerchiefs
Five down, five to go.  The next one should be up this Friday, I hope.
Read More »

Monday, October 17, 2011

Hair Accessories Again? A Tutorial

One can never have too many hair accessories, especially someone like myself who can’t really do anything with hair except brush it and stick a clip in it.  And these were so pretty, I decided to show you all how to do them. 

Yep, another tutorial.  This one is for a large lacey barrette with flowers.  At least I think it’s a barrette. 
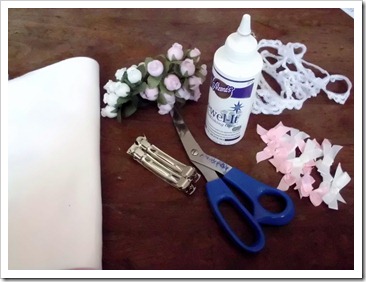
Flower and Lace Barrette Tutorial

Anyway, you will need:

  • Large barrettes or other clips and such if you prefer.
  • Fake roses or other flowers.
  • Lace, good chance to use up some of your leftovers.
  • Premade bows if you wish or other embellishments of your choosing.
  • A decent glue, I used Aleene’s Jewel-it again.
  • Scissors
  • Felt scraps in colors that match your flowers, bows, etc.
  • A threaded needle, could be optional depending on your lace.
Flower and Lace Barrette Tutorial

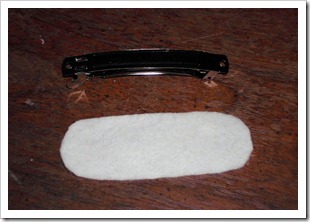
First, cut your felt in a long oval shape about as long as your barrette/clip/whatever.  This will be used as a base so it doesn’t really have to be perfect.
Flower and Lace Barrette Tutorial

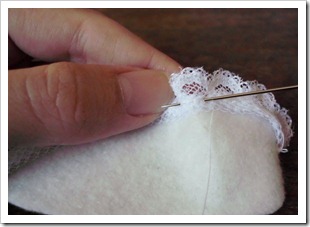
Start sewing the lace to edge of the felt.  You could try gluing it on instead, but I wouldn’t recommend it.  It depends on your lace and how easy it is to work with.
Flower and Lace Barrette Tutorial

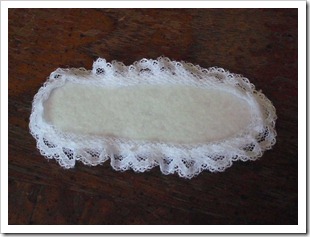
Should look something like this, sort of like a little rug.
Flower and Lace Barrette Tutorial

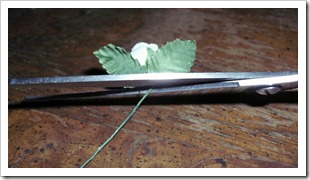
For the flowers, I used roses with wire stems and had to cut the stems off.  This way they can be glued down easily.

Flower and Lace Barrette Tutorial

About six roses are all that are really necessary.
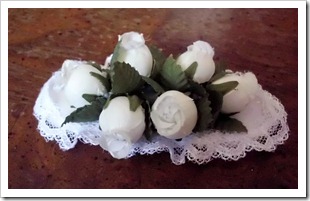
Flower and Lace Barrette Tutorial

Arrange your flowers on the felt base how you want them before gluing them securely in place.
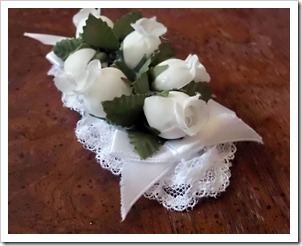
Flower and Lace Barrette Tutorial

If you choose to do so, you can glue some bows on the edge or anything else you like.  Charms, ribbons, whatever works. 
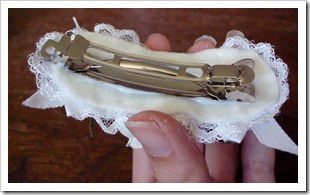
Flower and Lace Barrette Tutorial

You should probably wait about 10 minutes for the glue to dry before this last step (go make a sandwich or something).  Simply flip the whole thing over and glue it to the barrette/clip.  Then set it to dry somewhere safe.
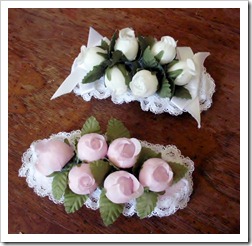
Flower and Lace Barrette Tutorial

Now you have a lovely new hair piece that didn’t take long at all to make, except for drying time. 

I made two, one pink and one white.  They kind of look like something for a wedding or Easter though, maybe if the flowers were a different color or type.   Like mums for Fall and holly for Christmas.

Here’s the updated list:

  • Bags
  • Bracelets
  • Barrettes
  • Doll pajamas
  • Doll makeover
  • Wristbands
  • Red skirt
  • Ears
  • Costume
  • Handkerchiefs
Four down, Six to go. The next project should be up by Wednesday.  Why do I always seem to finish on Wednesdays?

Update: I made an easy tutorial for small ribbon bows that would be perfect to use instead of the premade ones.  Feel free to check it out.
Read More »

Saturday, October 15, 2011

It’s Finished Already?

DSCI0696
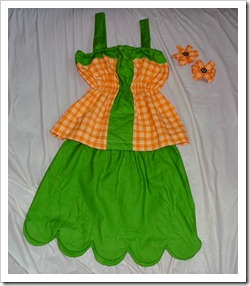
A few weeks into October and I’ve already finished making my Halloween costume.  How in the world did that happen?  With me it usually seems to take this long just to decide on a costume. 

Yet here it is, and it only took a couple of days to complete.  It was inspired by those cute pumpkin trick-or-treat bags I made (see Trick-or-Treat?).  I guess it’s sort of a pumpkin fairy/elf thing. 

The top is made in a similar way as the bags except for of course being open at the bottom and the elastic at the top and just below the bust to give it some shape. 

The bottom is a simple elastic waist skirt except for the scalloped hem.  That did take some time with a marking pen and all. 

To finish up the look, I made some quick hair combs with some scraps of the orange fabric and a couple wooden buttons.  Now I have a cute and surprisingly comfortable costume that cost less than 2 dollars to make.  Perfect.

Here’s the updated list:
  • Bags
  • Bracelets
  • Barrettes
  • Doll pajamas
  • Doll makeover
  • Wristbands
  • Red skirt
  • Ears
  • Costume
  • Handkerchiefs
Three down, Seven to go.  The next project should be up by Monday.
Read More »

Thursday, October 13, 2011

Trick-or-Treat?

I had intended to post this yesterday, but they were some technical problems.  The good thing is that it was definitely not my fault.

At my house, we hate to give out candy to trick-or-treaters.  Or to be specific, we hate to give out just candy.  The problem with candy besides the rotting teeth thing is it doesn’t last very long after the holiday.  Plus, not all kids can eat all types of candy.  Some kids are allergic to milk as in milk chocolate and some can’t eat hard or chewy candies.  So in our treat bowl we usually try to add a mixture of goodies.  A typical selection includes some mixed candies, safety pops, holiday pencils, spider and skulls rings (from Dollar Tree), and some sort of homemade trinkets.

Foam Halloween Bracelets

These are the homemade goodies for this year, Halloween bracelets.  I cut out themed shapes from foam sheets I got at a thrift store.  It took two shape cut outs for each bracelet.  The top one I punched holes in to make face parts or decorations.  The bottom one had slits cut to stick the elastic through before sewing the ends together.  The bottom layer was cut from a contrasting color because it shows through the holes, but I guess that’s kind of obvious from the photo.

Anyway, they came out looking so cute that I kind of am hoping that we don’t get too many trick-or-treaters this year.  Maybe just the few at home.

Cute Pumpkin Trick or Treat Bags
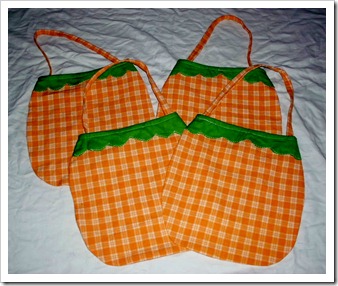
Speaking of which, I made cute little treating bags for my niece and nephew, assuming they will want to use them.  The third one is for me to use since they are so cute and then I've got a fourth one just in case.

In case it isn’t obvious for some of you, I got the fabric from my last trip to Goodwill (see Finally Remembered).  I guess I could have used a solid colored orange fabric but I thought the patterned fabric would be cuter.  You can still tell they are supposed to be pumpkins right?  The only other problem would be the size, are they too small for trick-or-treating?  I guess that’s what the backup one is for.

Here’s the updated list:
  • Bags
  • Bracelets
  • Barrettes
  • Doll pajamas
  • Doll makeover
  • Wristbands
  • Red skirt
  • Ears
  • Costume
  • Handkerchiefs
Two down, eight to go.  The next project should be up either tomorrow or Saturday.

One more thing, I posted this question on twitter and thought I should ask here too.  I’ve been wondering if I should sign up for a Flickr account.  Any thoughts?
Read More »

Monday, October 10, 2011

Finally Remembered

…To take pictures that is.  I have made several trips to different thrift stores over the past few months, but I never mentioned most of them because I would forget to get the camera out until weeks later.Embarrassed smile 

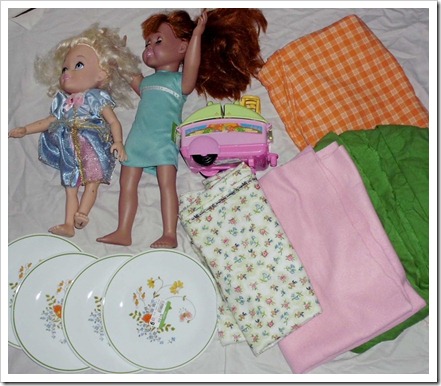
This weekend there was another half-off sale at Goodwill that I felt I had to attend due to the number of great items I spotted while browsing before the sale.  It’s an odd habit of mine, I see something I like, see the price, hate the price, come back for it when it’s on sale.
DSCI0647

Here’s what I got:

  • Pink and green felt, more green than pink but for good reason.
  • A remnant of really soft fleece in a cute floral print.
  • A decent amount of a orange print, already have plans for it.
  • Four really cute plates, they’re microwavable and dishwasher safe.
  • An 18 inch doll, she’s a Springfield Collection doll (those ones they sell at Michael’s and Joann) and she was only a dollar.
  • A Fisher Price Little People camper, it make animal noises and I know a little guy who would love it.
  • An 18 inch Cinderella doll, perfect for a certain princess loving little girl and it was only 50 cents!

    The total cost was just a little more than 6 dollars.  Not too bad right?  Let’s see if I can beat that next time.
  • Read More »

    Saturday, October 8, 2011

    Up to Twenty-Two

    faires images graphicsfairyblrd
    Just finished writing up the new list.  It has several “Halloweeny” items on it which isn’t too strange since it is October, but it is more than I usually have.  Also couple a doll things again.
    Project List #22
    • Bags
    • Bracelets
    • Barrettes
    • Doll pajamas
    • Doll makeover
    • Wristbands
    • Red skirt
    • Ears
    • Costume
    • Handkerchiefs
    I should have everything finished up a couple days before Halloween.  Before because they is something special then, plus it would be pretty bad to finish Halloween crafts after Halloween.
    Read More »

    Friday, October 7, 2011

    Just a Couple of Sweaters

    I still haven’t finished drafting my new list, that should be up by tomorrow assuming I can finally decided on a few of the projects.  Anyway, this morning I decided to work on a few little things I had lying around.  Call them “mending” projects.

    DSCI0623

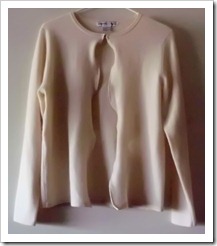
    This is a sweater thing I got for free from a thrift store downtown.  See why it was free?  The crocheted edge was ragged and had come undone in various spots and some of the buttons were missing.  It was mostly a job of removing the rest of edge and buttons in order to fix it.

    DSCI0627 So after removing the “mess” shown here and adding some ribbon…

    DSCI0629

    …I got this.  Noticeably better.  The ribbon was threaded on a needle and “sewn” on with a running stitch.  I tied it in bows at the ends on the bottom and at the neckline to tie it close.  It’s cute, but sadly it looks very Spring.  Just when we were finally starting to experience Fall weather here.

    DSCI0637

    I guess that where this comes in.  I forgot to take a before photo but it was a pullover sweater made of the softest cashmere ever.  I got it from a friend as a hand-me-down, aren’t friends wonderful?  Anyway, pullovers aren’t quite my style so I opened it up.  I just cut down the front, then sewed some peach-colored ribbon along the edges before turning them under and sewing them down.  After that, all I did was sew a hook and eye to the top and glued two faux pearls.  This was to cover the stitches from the hook and eye which weren’t entirely hidden.  Plus it makes it prettier.  Now I have two similar sweaters for Fall and Spring, and they didn’t cost me a dime.Red heart

    Read More »

    Monday, October 3, 2011

    Easy Being Green Plaid

    For the final project on this list, I saved the best for last.  Actually I think that doll I made is better (see Brown Eyes), but this one is pretty cute too.
    DSCI0612
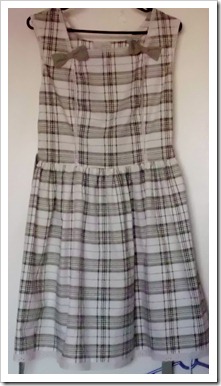
    See, a pretty new dress.  I bought the fabric months ago intending to make a dress with it.  The problem was that it was summer at the time and this pattern doesn’t exactly scream “summer”.  It reminds me more of Back to School, which is why some of you may notice that it is the same fabric I used for my binder cover (see Clean and Covered).  It a fairly simple pattern, at least it should have been.  The only problem with it is that it is just a teensy tiny bit too big for me in the bust area, flattering right?  Otherwise I love it.  The green bows are removable too, so I can move them to anywhere I want including my hair.
    DSCI0614
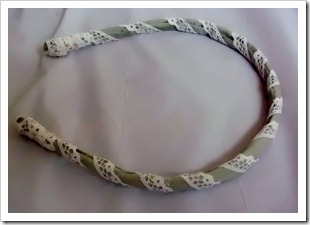
    Speaking of hair, a dress isn’t complete without matching hair accessories like this quickie headband.  Just a few minutes with a scrap of fabric, a small length of lace, a metal headband and of course a glue gun.  The best part about it is it’s simplicity.  Makes it easier to wear with other things.
    DSCI0618
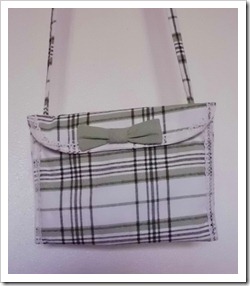
    And last but not least, a matching bag.  This one was mostly made out of necessity.  It’s cute and hides easily under my choir robe.  That’s the necessity part, normally for Choir everyone locks their purses and bags in a certain closet in the choir room.  That is until it got broken into some time ago.  I was one of the lucky few who wasn’t robbed then.  Anyway, despite a change of locks and a guard thingie installed, it happened again a couple weeks ago.  Scary right?  I was lucky again this time.  This means we all have carry our bags into service.  It kind of looks strange to see the choir walk in with big old purses hanging on their arms.  Hence, the need for a tiny and discreet little bag like this one.  Maybe I should make more for the other members?  Hmmm.
    Here’s the updated list:
    • Hair elastics
    • Acorn pins
    • Tiny shoes
    • Tiny purses
    • Dress
    • Pencils
    • Cat toys
    • Tiny dresses
    • Cloth doll
    • Tiny accessories
    • Green dress
    Eleven down and out, and just in time too.  I’ve got plenty of things I need to make for October.  I’ll have the next list up in a few days.
    Read More »